|
|
Post by Celestine on Dec 10, 2004 20:54:50 GMT -5
Hi all, I'm recently on holidays and decided since there are so many questions on modelling, I'd answer them all. But soon, I discovered many are asking similar questions. So, I decided I'd write up a comprehensive modelling guide for everyone on the forum, with varying difficulty levels so you can choose which ever one suits you.
So here is a comprehensive modelling guide for many to start off on. I have not included things such as using metallic buffing paints, and how to mold your own parts.
So please note - it is extremely long. It has also been divided into parts as the forum does not allow over 10000 characters each time, so I've divided them into sections.
I hope this will benefit everyone and I hope you will use some of these techniques as they have taken me a long way from basic modelling.
|
|
|
|
Post by Celestine on Dec 10, 2004 20:55:17 GMT -5
Justin’s Modelling Guide
A brief introduction
This entire modelling guide has been divided into three different difficulty levels. This is to allow modellers to select the difficulty level they are comfortable with to obtain optimal results within their reach. Many of the techniques used require practice. Don’t be put off if your final product does not achieve your expectations (as practice makes perfect). This guide will begin with how to prepare your parts, to assembling them, to painting them, and finally finishing off the kit.
When I model, I aim for perfectionism, but many flaws are still visible (though many say they cannot find any). Modellers should not focus on the final product on the box-art as the models pictured are made by professional (who do it for a living), and photographic skills (which can often hide their flaws).
Using the correct tools will allow you to complete the kit effectively and nicely. Everyone may be have limitations to the tools they have, but if you decided to take modelling as a hobby, there are some bare essential tools which you require to make your modelling experience more enjoyable, while yielding a nicer final product. Once you have these tools, they will bring you much joy and allow you to exceed what you thought you were capable of. Below is a list of the tools you should have:
- Hobby Knife (with spare blades in case it goes blunt or snaps)
- Side Cutters (used for cutting the parts off the tree).
- Stanley Knife (used for removing large sections of burr from the parts)
- 400 grit sandpaper and 1000 grit sandpaper (used for filing off the small fine sections of burr from the parts)
- Cutting board (so you don’t destroy the surface you’re working on)
* Later on in the guide, I will explain why these tools are essential
1. Preparing your model
Many people do not realise this, but before assembly commences it is advisable to wash all the parts in warm soapy water (besides electronic/photo-etched), to remove all mold release agent. Mold release agent often disturbs the surface of the paint (as it is oil based), and spreads the paint unevenly or affects the decal being applied. So by washing it, you’ll create an even surface for further work. Tamiya, Hasegawa, Fujimi, Bandai, Tomy, Aoshima and other major Japanese brands clean their sprues before they are packaged and this process is not necessary. Other kits such as Trumpeter, Dragon, and other brands often require washing as they are not processed before dispatch.
|
|
|
|
Post by Celestine on Dec 10, 2004 20:55:44 GMT -5
2. Cutting parts off a sprue (tree)
Many people often use a hobby knife and cut directly down where the part joins onto the sprue. This is the incorrect method as sometimes you can cut too deep into the actual part you’re trying to extract, or leave an undesired ‘dimple’ where the part once joined onto the sprue. How do you go about not creating a dimple and having a smooth surface?
Beginners: Using the side cutters, align the cutters to the end of the section of the part where the extra plastic joins to the sprue. Cut each joiner with a piece of excess plastic. Once the part is removed from the tree, align your side cutters against the piece and the burr (excess plastic from the tree) and remove it.
Moderate: Follow the above method. After removing the excess plastic, use a Stanley knife and remove any excess to make the surface look smooth.
Advanced: Follow both above methods. Cut a small piece of 400 grit sandpaper and gently rub along the surface where the part was once joined to the sprue. Sand section until smooth.
*Checkpoint: Do NOT use your fingernails to check the smoothness. Often the fingernails will depress the plastic (as the section cut off from the sprue becomes weaker as it was once supported). Instead, run your fingertips over it to check smoothness.
Once smoothed, use 1000 grit sandpaper to smooth it out even further. The 1000 grit sandpaper should remove any marks of where the part was once joined to the sprue without discolouration. From about half an arm’s length, the mark should be completely invisible.
FAQ: What causes the dimple?
A: Uneven force applied as the plastic joining to the sprue is weaker than the rest of the piece. Also, when you twist or snap parts off, you are forcing it to break in an un-natural way which it was not designed to do. As mold designs are different from company to company, be careful not to force parts to break.
3. Assembly
Many people assemble parts without second confirmation from the instruction booklet (I myself have done this many a times), which can sometimes lead to irreversible errors, especially in snap-tight models.
Beginners: Refer to the instruction booklet; ensure the parts you’re joining together are correct. Then join tightly – ensuring no gaps (minimal gaps may sometimes cause problems later on, especially snap-tight models).
Moderate: As above, to ensure better and more secure fit – apply a small amount of plastic cement into the ‘wells’ where the parts join.
Advanced: As above, but before pushing the parts together, apply a thin layer of plastic cement around the flat surfaces which are will in contact with each other. Squeeze the excess glue out and allow the cement to dry. Once dried, use putty and fill in any seems which should not be visible (if in doubt, refer to instructions, reference material, or box-art) and allow the putty to dry. Once dried, sand the joined parts (puttied or excess cement), to a smooth flat surface, then sand again with 1000 grit sandpaper for a final finish.
*Checkpoint: Check that the 2 halves have been fully pressed together.
FAQ: Do I need to glue the parts still even though they are a snap-tight kit?
A: No, it is not required, but it is recommended as some of the molds used deteriorate with age, and sometimes don’t fit as well as they originally did.
|
|
|
|
Post by Celestine on Dec 10, 2004 20:56:14 GMT -5
4. Painting
It is not recommended for first time modellers to paint a model. The paint job on a model makes or breaks the difference between a masterpiece or ‘just another kit’. If first time modellers are keen on painting, you have to be prepared that your model may not result as what you initially intended, thus I do not recommend it. It is ideal that you paint on an unwanted (with the same basecoat/primer coating/colour/material) as the actual model you’re going to paint. By testing, you know the exact colour and the final finish effect on the plastic you’re about to paint on. Only recommended for average to advanced modellers. Be sure to practice first on an unwanted model to prevent ruining your latest masterpiece!
- Base-coating: Base-coating your model allows the paint to be spread over an even surface, and protects the paint from chipping off as easily as it has a medium to grip on.
Spray a THIN layer or surface primer. Spray horizontally and not vertically, and ensure you do NOT stop spraying halfway through the model. I personally recommend Sangyo Gunze’s “Mr. Surfacer 1000”. Other surface primers can be used ie – Tamiya Fine Surface Primer, etc. Allow approximately 12 hours drying time before painting over the base-coat.
* Do NOT use automotive surface primers on your model! Automotive surface primers are not designed for models and tend to spray on in a thicker coat than what is required.
- Spraying/Air Brushing: Larger surface areas are generally sprayed/air brushed.
Spray Cans: Shake the can vigorously for about 2 minutes and run the can under hot tap water for about 45 seconds. Turn the can to ensure all the paint inside has been warmed. Dry the can and re-shake for another 2 minutes before spraying. Spray a thin coat from a distance no less than 30cm’s from the working surface. Spray horizontally and never vertically. Do NOT stop halfway through the model. Allow adequate drying time of about 5 hours before respraying the surface again. With correct application, 2 layers should cover the model completely and adequately. Spraying thin coats will prevent overspray, which often causes paint to crack. Spraying will insure a smooth paint finish (without brush marks/streaks). Furthermore, it dramatically cuts down the time required to paint the same surface by hand.
FAQ: Why heat the spray can? Won’t it explode?
A: Heating the spray can will heat the paint up inside, the paint will spray smoother and thinner (than under normal conditions). It also forces the can to depressurise less (which is why the can turns cold and the spray becomes less and less and eventually spits blobs of paint). Paint is like oil and when you heat it up – it smooths itself out and runs smoother. No, the can will not explode under the heat from the hot tap water. The can will only explode if you place it under high pressure such as a fireplace.
Air Brushing: Thin the paint that will be air brushed on, depending on paint thickness and type. Test pressure of air pressure can/compressor on how far you should spray on an unwanted model. Once you have a grasp of what distance is required between the model and your air brush, you can now start spraying on the model. Spray in a horizontal motion making sure you overlap painted sections slightly (to avoid the base coat showing through or a missed spot).
FAQ: What should my air brush paint mixture look like?
A: It should be of milky consistency. Generally a 1:1 ratio of paint and thinner works well.
FAQ: What can I do to stop the air pressure can from depressurising so quickly?
A: Heat the can up under hot tap water as you would for a spray can. This will slow down the depressurisation of the can. But never the less, if you are spraying with air pressure cans, do not spray constantly. Allow the can to warm up to the room temperature again to allow stronger pressure.
|
|
|
|
Post by Celestine on Dec 10, 2004 20:56:50 GMT -5
- Brush Painting: Ideal for smaller surfaces and fine detail. There are many different techniques you can use by brush painting.
* Acrylic and Enamel paints
NEVER SHAKE THE PAINT BOTTLE! It will create air bubbles which can often ruin your model by leaving unwanted marks (mentioned below). Stir the paint with a metal rod, or stick, etc. Ensure the mixture is thoroughly mixed in.
Thin the paint down as required and paint in an even strokes (towards you), and do not pull the brush back up (outwards from you). Doing so will disturb the flow of the paint and because an uneven mark will form between the surfaces of the paint causing a visible line once the paint is dry. Do not paint thick layers. Paint thin layers and build up to the shade you would like. If you are painting with light colours such as white – paint more thin coats to ensure a proper colour shows through, or you can base the sections you would like to paint in silver, which will back up the colour making it less ‘hollow’.
FAQ: Help! My paint is too thick, what can I do?
A: If the paint is still wet, try to remove it with thinner. If the paint is dry, sand it back with 1000 grit sandpaper, then 1500 grit, then finally 2000 grit to ensure all scratch marks are gone.
* Dry brushing: A technique which is commonly used to allow paint to build up on raised areas and ridges.
Use an unwanted brush for this application as it will ruin your brush. Use a colour a shade lighter than the colour you are going to paint over, and remove as much paint from the brush as possible by wiping it over a piece of paper or tissue paper. When you have removed enough paint – test it on a piece of plastic to ensure that the depth is the effect you want. If it is – apply it to the model in an even brush stroke (up/down but never across) until raised areas are covered.
* Stippling: A technique used to paint rough edged camouflage.
Use an unwanted brush and remove the paint as you would if you were dry brushing. Instead of using up/down brush strokes, turn the brush on the surface you would like to paint in a circular motion. The results can vary depending on how hard you press down onto the model and how many times you have circled over that section of the model.
*Washing/Inking: A simple and effective method of detailing fine lines, which are normally too thin to paint in (as we don’t have such a steady hand). Also used when you want to add detail and depth to things such as hair and uniforms.
Thin the paint to a ratio of 1:10 (1 part paint, 10 parts thinner). When applying the paint, ensure that there are no air bubbles in the paint and also after you have painted it onto the model. The air bubbles once dried can cause undesired effects (ie – a circle in the colour of the wash with raised edges of the circle. Thus by eliminating air bubbles, you will not have as many problems during application of the wash. When washing use an appropriate sized brush and brush over the surface you want the paint and allow the paint to seep in (ie, panel lines). If you intend to use acrylics as a wash, use demineralised water as a thinner.
Inking can also be done by letting gravity do the job. Turn the model so the line/detail you wish to paint is 90 degrees to the ground. Use a fine detail brush 0/5 or something similar, with a little bit of ink on the brush, carefully dab the brush in from of the crevice and allow it to flow down naturally. Thinning the ink is similar to the paint, though the ink may not be as effective for washing as paints are.
FAQ: Enamel or Acrylic or Ink? Which is better for using as a wash?
A: In general the enamel will be better for a wash as it does not leave as many marks behind as acrylics, as the paint and thinner mixture doesn’t create many air bubbles (or any at all). But never the less, acrylics can achieve the same results if used correctly. Ink is more suitable for car models as they have straighter lines (always going downwards with gravity too).
|
|
|
|
Post by Celestine on Dec 10, 2004 20:57:24 GMT -5
5. Finishing
- Stickers/Decals
Some kits include stickers (generally in snap-tight kits), and decals (waterslide transfers, generally found in kits which require gluing).
Beginners: Peel the desired sticker off with the tip of the hobby knife. Position, and stick the sticker on, removing all air bubbles.
Moderate: Cut along the edges of the stickers using a metal ruler (to reduce the visibility of the sticker edges). Peel off with the hobby knife, position and stick, leaving no air bubbles under the sticker.
Advanced: Use the decals that came with the kit. If the kid did not come with waterslide decals, scan the decal sheet into your. Use waterslide transfer paper and print the designs onto the waterslide transfer (use a Laser printer only as the Bubble jet printers often run when in contact with water). Cut out the transfer, dip in water, wait, and position and then apply onto the model removing all air bubbles and excess water. Once the decal(s) are dry, conceal the edges by using decal sealant, but is not required unless you want to go to the extreme.
I personally use Gunze’s “Mr. Softer”. Apply a thin layer of the solution over the dry decals and wipe off any excess, leave and wait.
* Checkpoint: The Mr. Softer decal solution WILL craze the decal. The decal will look as though it’s been bunched up and torn. DO NOT TOUCH IT! Touching it will only destroy the decal. The solution removes all air bubbles and other elements thus bonding the decal to the surface thus sealing it. Just leave it to craze and return in about 12 hours. You will discover that the decal has returned to how you applied it before, but minus the edges.
- Clear Coating
A final clear coat will protect your model from the elements. There are a variety of clear coat paints you can choose from. If you want your model to look bright, use Gloss Clear. If you want a dull effect, use Matt Clear. If you want an in between look, use Semi-Gloss Clear. If you do not intend to spray a clear coat over your model, try to keep the model dust free.
Mask off any sections that you do not want sprayed (ie Cockpit, Clear plastic, etc), with Masking tape. Ensure that there is no gaps or air bubbles trapped under the masking tape as this may give the paint a chance to bleed through (which can often ruin a otherwise nicely completed model). Shake the can for about 2 minutes. Spray a thin layer onto working surface in even horizontal motion strokes from a distance no less than 30 cm’s. Do NOT stop halfway through the model. Allow the clear coat to dry. Once dry – respray another coat of clear and allow drying.
Sit back and Enjoy your Masterpiece~!
|
|
|
|
Post by Celestine on Jan 9, 2005 21:34:19 GMT -5
I've decided to add a "Gundam Marker" section to this guide.
The gundam markers are commonly available in many hobby shops. They are enamal based and great for fine detail lines such as panel lines.
Simply in a top to bottom motion, place your marker into it, then draw the line in as you would with a pencil. If you make an error, Bandai have released a "eraser" marker, but it sometimes may eat away at your paint. So I personally suggest using a soft plastic eraser to remove the stuff ups.
Once you are finished, leave it to dry and spray a thin layer of clear spray to seal it in. Often the oil from our hands can smear the paint, so be careful when handling sections painted in with the marker.
|
|
|
|
Post by Celestine on Jan 12, 2005 18:44:00 GMT -5
I've decided to add another chapter to this guide. This next section will be "How to fill molding gaps". This only improves the overall appearence of your Zoid from different directions, but unfortunately does not help in any other way.
As we all know, it is easier for companies to use 'mold gaps', empty holes (ie, on the not so visible side of many Zoid's legs), as it saves them on production cost, and easier mold creation. So, how do we eliminate this problem? Easy.
*This step should only be taken by more advanced modellers. If you decided to go ahead with this process, keep in mind that you will definately have to paint the Zoid! So, think carefully before you put your precious Zoid back onto the modelling board...
Use epoxy 2 part putty (ie, Tamiya's epoxy molding compound, etc..). Roll 2 equal haves of both compounds and mix in thoroughly. Once completed, fill the gaps as tight as possible, leaving a small amount of excess over the sides (this is to eliminate any possibility of the maker not puting enough epoxy putty in to start off with, and will often stop more gaps from occuring between the putty and the part you're filling). Leave the putty to dry. Once the putty is dried (leave for 24 hours is the safest way, but it will also depend on room temperature). Slowly sand away the excess areas in an even fashion with 400 grit sandpaper or 600 grit sandpaper (or a fine dremel sanding bit). Once the surface is even, check for any more gaps. If any more gaps form, make sure you fill them again with either normal putty or epoxy putty, let it dry and sand it back.
Once its nicely sanded back, you can commence priming the surface, and then finally hand painting/spraying it. If you decided to go ahead with hand painting, I personally suggest you use an acrylic paint as if you end up with brush marks its easier for you to strip paint off, as enamels will go back into turps which often 'eats' and deforms the plastic (which will ruin your model completely).
|
|
Argyle
Lance Corporal
 Quantized
Posts: 77
|
Post by Argyle on Jul 23, 2012 16:04:24 GMT -5
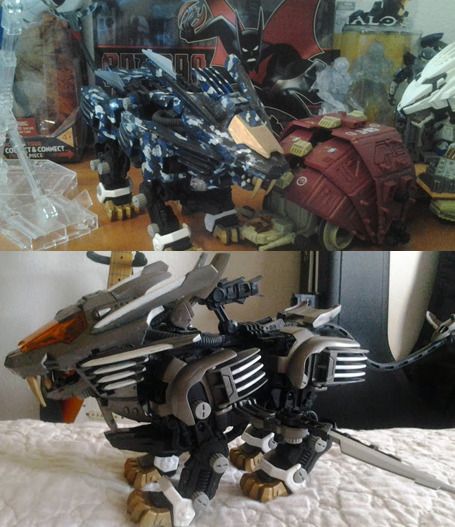
I'd like to add my two cents, if you don't mind: For the removal of unwanted paint on a model, I recommend Simple Green (an all-purpose cleaner). It works great for removing even the toughest paint residue (especially multiple enamel coatings).  Depending on how many coatings there are and how long they have been on the plastic/metal surface, it may take anywhere from a few hours to a couple of days. Of course, you'd want to have Simple Green in a small container and soak the target piece in it. You're going to have to scrub off the stubborn paint. It's really a simple process that should save you a lot of money (but will take patience!). I've used it for many Gundam models with stubborn paint residues and they've come out great. In fact, as I'm posting this, I've been cleaning off the messy paint job on my Blade Liger. You can find it on online stores and places like Target, Walmart, and especially Lowe's. Best of all, it doesn't eat through plastics like nail polish remover and you can use it to clean other household appliances! |
|
|
|
Post by Maethius on Jul 25, 2012 9:48:45 GMT -5
I've heard this tip at a form for painting war-game miniatures, too. Apparently it's a cheap miracle product for the hobbyist just like Finish floor wax is to fix scratched clear plastic and clear coat models for cheap. Great tip!
|
|
Argyle
Lance Corporal
Quantized
Posts: 77
|
Post by Argyle on Jul 25, 2012 21:43:40 GMT -5
Definitely! It does the job for a mere $7 or so plus tax. Surprisingly, it did not eat through most of the pre-painted parts of the Blade Liger (the white ones), with only minor touch-ups needed to restore the portions that were eaten away by the chemical. That may also be because I scrubbed the head armor the most, though.
For an average-sized Zoid model, it would take about half a container of Simple Green to do the job (assuming you don't want to clean everything). However, it took the whole thing to take the paint off of my Blade Liger. I'll edit this post with before and after photos once I get a hold of my camera.
|
|
|
|
Post by Maethius on Jul 26, 2012 10:49:48 GMT -5
Any damage to the plastic, or just to the paint? My wife is looking to strip some plastic wargame miniatures and sell them; they are worth more if they are paint/primer free.
|
|
Argyle
Lance Corporal
Quantized
Posts: 77
|
Post by Argyle on Jul 26, 2012 18:07:20 GMT -5
Great idea! I hear they sell pretty well. Sorry for the rather late response (I just got off of work). To answer your question, I thought a before and after pic would be much better than just taking my word for it.  As you can see, it does the job of removing the paint. It won't damage the plastic so long as you scrub the parts with a tooth brush or other utensil that doesn't normally damage plastic (like, for example, a metal scrubby or another piece of plastic). Again, it does take a little patience (or a great deal of patience, depending on how many layers of paint and how long it's been on there) to remove the undesired paint. The enamel paint on my Blade Liger has been there for about a year so I had to let the parts sit in a cup of Simple Green for about an hour, then I went off to scrub the paint. There were some stubborn parts due to extra layers of white and blue (the failed camo effect), but they eventually came off. =) |
|
|
|
Post by Maethius on Jul 28, 2012 1:38:52 GMT -5
Wow... it looks like a completely untouched kit! That's fantastic news!
|
|
|
|
Post by wolves on Aug 16, 2012 0:14:14 GMT -5
Amazing! Thanks for the tip!
|
|